- Introduction
- But it’s a bit too big for just small deployments, isn’t it?
- That’s cool, but is it ready for production?
- So how do we use it?
- Conclusion
Introduction Link to heading
Before I talk about Prompty, I need to tell you about Promptflow. It is a suite of development tools to easily interact with LLMs and create AI applications. As the name suggests, it works by using flows. We define a sequence of actions to be performed during a request using a YAML file in the form of a DAG combined with Python code and Markdown files powered by Jinja. Recently, it has also become possible to create flows using only Python code through classes or functions, called Flex flows, but that is not the subject of today.
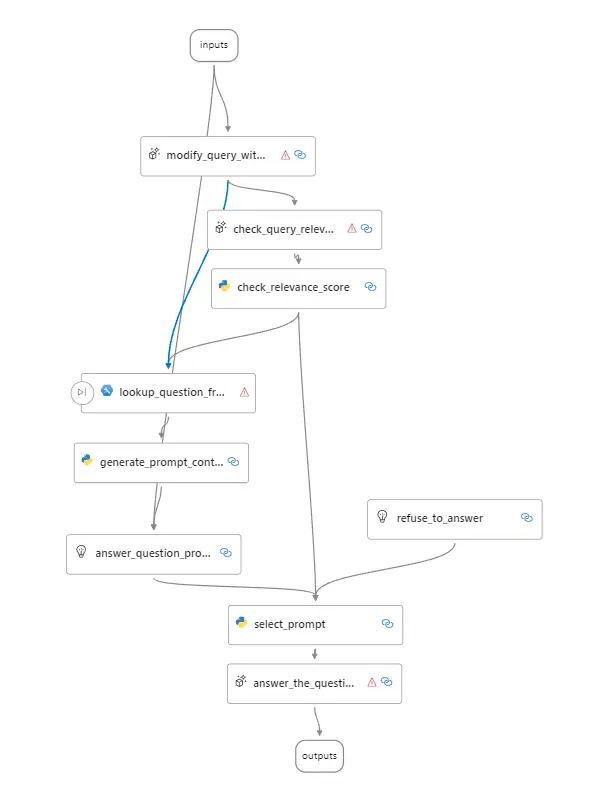
Example of a PromptFlow DAG
Even if it’s a project developed by Microsoft and available on their AI platform, it’s relatively easy to detach from Azure and run it wherever you want using a Docker container or executable.
But it’s a bit too big for just small deployments, isn’t it? Link to heading
Yes, that’s true if we just want to make a call to OpenAI using a simple template. That’s where Prompty comes in! Everything is done in a file that combines Markdown and YAML frontmatter. We get the power of the Jinja template engine with the simplicity of defining our connection and variables.
Then we can use this file with the Promptflow CLI or a small piece of Python code that can be embedded wherever we want.
That’s cool, but is it ready for production? Link to heading
Well, it’s still in preview, so I’d be careful before considering it for production. The feature was released at the end of April, and there’s no guarantee that there won’t be major changes in the future. However, Prompty doesn’t do anything magical in itself, it simply saves development time for interacting with LLMs. If the project is abandoned or something, it will still be possible to replace Prompty with fully written Python code, although it will take some time to set up.
So how do we use it? Link to heading
Since you seem eager, let’s get down to business! I’ll explain how to create your first Prompty from scratch, and we’ll gradually increase the complexity (and therefore the fun). Are you ready?
Prerequisites Link to heading
To get started, you need access to Python. The Promptflow website recommended version 3.9 until a few weeks ago, but you can use any version higher than 3.9. If you want to follow best practices and avoid potential conflicts with other packages, you can create a virtual environment with venv or conda.
python -m venv prompty
# Linux/MacOS
source prompty/bin/activate
# Windows
prompty\Scripts\activate
Then you need to install promptflow to have access to the CLI.
pip install promptflow
Let’s test if the CLI is properly installed and accessible.
pf --version
If all is well, you should see the version of the various promptflow packages.
Creating Your First Prompt Link to heading
Now it’s time to create your first `.prompty’ file. This is a file type recognized by Promptflow that combines Markdown with front-matter and Jinja format.
Create a hello-world.prompty file with the following content :
---
name: "Hello World"
description: "A simple hello world powered by GPT"
model:
  api: chat
  configuration:
    type: openai
    model:  gpt-3.5-turbo
    api_key: ${env:OPENAI_API_KEY}
  parameters:
    max_tokens: 128
    temperature: 1.4
inputs:
  first_name:
    type: string
  last_name:
    type: string
  tone:
    type: string
sample:
  first_name: John
  last_name: Doe
  tone: ceremonious
---

system:
You are an assistant who greets people. You will add a touch of originality to each person. You must have a "{{tone}}" tone.
Your only job is to greet people. You may not answer questions or comment on anything else.

The person's name is "{{first_name}} {{last_name}}".
Let’s take a closer look at the content of the file together!
First, we have the front matter that follows the YAML syntax. It is defined between the two ---. It contains all the necessary and default information to run our Prompty. Here are the different pieces of information that can be included:
name: The name of our Promptydescription: A description to know what our Prompty doesmodel: The information for connecting to the openAI or Azure OpenAI API and the model parameters.api: The type of API to use (currentlychat)configuration: The information for connecting to the OpenAI APItype: Currently, onlyopenaiandazure-openaiare supported.model: The name of the model (openai only)api_key: The API key for connectingbase_url: Optional, the base URL for connecting to the API (openai only).azure_deployment: The name of the deployment on Azure OpenAI (azure-openai only)api_version: The version of the API to use (azure-openai only)azure_endpoint: The URL of the API (azure-openai only)
parameters: The parameters for the model. Here, the 2 most commonly used ones,max_tokensandtemperature.max_tokens: The maximum number of tokens to generate for the responsetemperature: The temperature to generate the response. The higher the temperature, the more “creative/crazy” the response will be. The closer it gets to 0, the more reproducible it will be.inputs: The different variables that can be passed to our model. Here, we have 3 variables,first_name,last_name, andtone.type: The type of the variable.
outputs: Optional, the output fields of the JSON if we use theresponse_format:json_object. It works like theinputsfield.sample: An example of data that will be used by default.
Then, we can write our prompt in Markdown. The prompt is quite short and consists only of a system block. It will describe the model’s behaviour and provide it with the necessary information to respond to the request. Here, we simply ask the model to greet someone in an original way.
There are 3 main blocks available: system, user, and assistant. The tool block is not supported at the moment. Make sure to have a line break after the : so that the block is recognised.
If you look closely at the markdown content, you can see Jinja expressions. This is what will allow us to use the inputs we defined in the frontmatter of our Prompty. To use a variable only, just put it between {{ and }}. The rest of the Jinja syntax is available here: https://jinja.palletsprojects.com/en/3.1.x/templates/
Connecting with OpenAI Link to heading
Now that we have a prompt, we just need to get the connection information for the OpenAI API. You can get an API key by clicking here. You can also use an Azure Open AI resource, but I won’t describe the procedure here.
Once you have your API key, you can add the environment variable OPENAI_API_KEY with the value of your key. It’s really easy!
# Powershell
$env:OPENAI_API_KEY = "your_key"
# Bash
export OPENAI_API_KEY="your_key"
(Alternative) Connecting with an OpenAI-compatible API Link to heading
If you don’t want to use OpenAI or Azure OpenAI, no worries! You can simply use another provider that’s compatible with the OpenAI API or use an Open Source model on your machine with ollama or LM Studio for example.
The only thing you’ll need to add in your frontmatter is base_url in model.configuration. I’ve got an example for Ollama for you here:
# ... Your config
model:
  api: chat
  configuration:
    type: openai
    model: phi-3 # Not used
    api_key: "Not_used"
    base_url: "http://localhost:11434/"
# ...
If you’d prefer to use an environment variable, you can easily replace http://localhost:11434/ with ${env:OPENAI_BASE_URL}. This way, you can change the URL without having to modify the file. And you can even use OpenAI later with https://api.openai.com/v1 as the value (just be careful with your model name).
Testing your Prompty Link to heading
Now that everything is set up, it’s time to get our first result with the following command:
pf flow test --flow hello-world.prompty
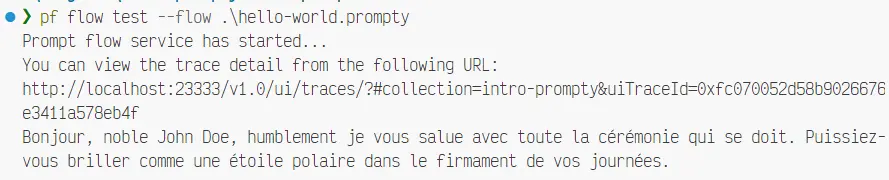
Result of the hello-world
If you click on the link before the answer, you can see the steps that were taken before reaching the answer and get more details. It’s not really useful for a Prompty, but for a more complex Promptflow, it can be very helpful.
Change the inputs
Now that the first test has passed, we can have fun with the input variables using the --inputs flag
For example:
pf flow test --flow hello-world.prompty --inputs first_name=Victor last_name=Santelé tone=funny

Résultat du hello-world avec des inputs
(Promis, j’ai pas triché sur le résultat)
Usage in Chat Link to heading
Now that we’ve had a little fun playing around with simple inputs, let’s take the logic a step further to allow interacting with our Prompty like a chat. This will basically keep the conversation history.
It’s really important to remember that the OpenAI API (and most LLMs) works in a “stateless” manner, which means it doesn’t remember previous responses. For each interaction, we need to send the entire conversation as context so it can respond correctly.
So, to do that, we’ll create a new file called “chat.prompty” with the following content:
---
name: "Email Sender"
description: "Chatbot to help with writing an email."
model:
  api: chat
  configuration:
    type: openai
    model:  gpt-3.5-turbo
    api_key: ${env:OPENAI_API_KEY}
  parameters:
    max_tokens: 256
    temperature: 1.4
inputs:
  question:
    type: string
    is_chat_input: true
  chat_history:
    is_chat_history: true
    type: list
    default: []
sample:
  question:
  chat_history: []

---

system:
You're a friendly assistant. You're going to help the user write an email. You need some basic information to start: the recipient's name, the subject, a summary of the content, and the tone of the message. You can ask the user these questions to get the information. You can also give advice on how to write an effective email. Once you have all the information, write the email while respecting the user's requests.

{% for message in chat_history %}
{{ message.author }}:
{{ message.content }}
{% endfor %}
user:
{{ question }}
You can then test the chat with the command:
pf flow test --flow chat.prompty --interactive
--ui flag.So, what’s new here compared to our hello world? Well, we’ve made a few changes to the parameters. We’ve added the user’s question and the conversation history. We’ve also specified that ‘question’ is a chat input with ‘is_chat_input: true’ and that ‘chat_history’ is a… chat history thanks to ‘is_chat_history: true’. This allows promptflow to understand which fields correspond to a message in the chat and where to store the history.
But didn’t I just say that the requests are stateless?
Yes, that’s right! The is_chat_history:true mention is only useful during interactive testing. It’s just a help for the developer. In production, we’ll have to manage the conversation history ourselves in the following format:
[
  { "author": "user", "content": "Hello" },
  { "author": "assistant", "content": "Hello! How can I help you today? " }
]
Here’s what it can look like:
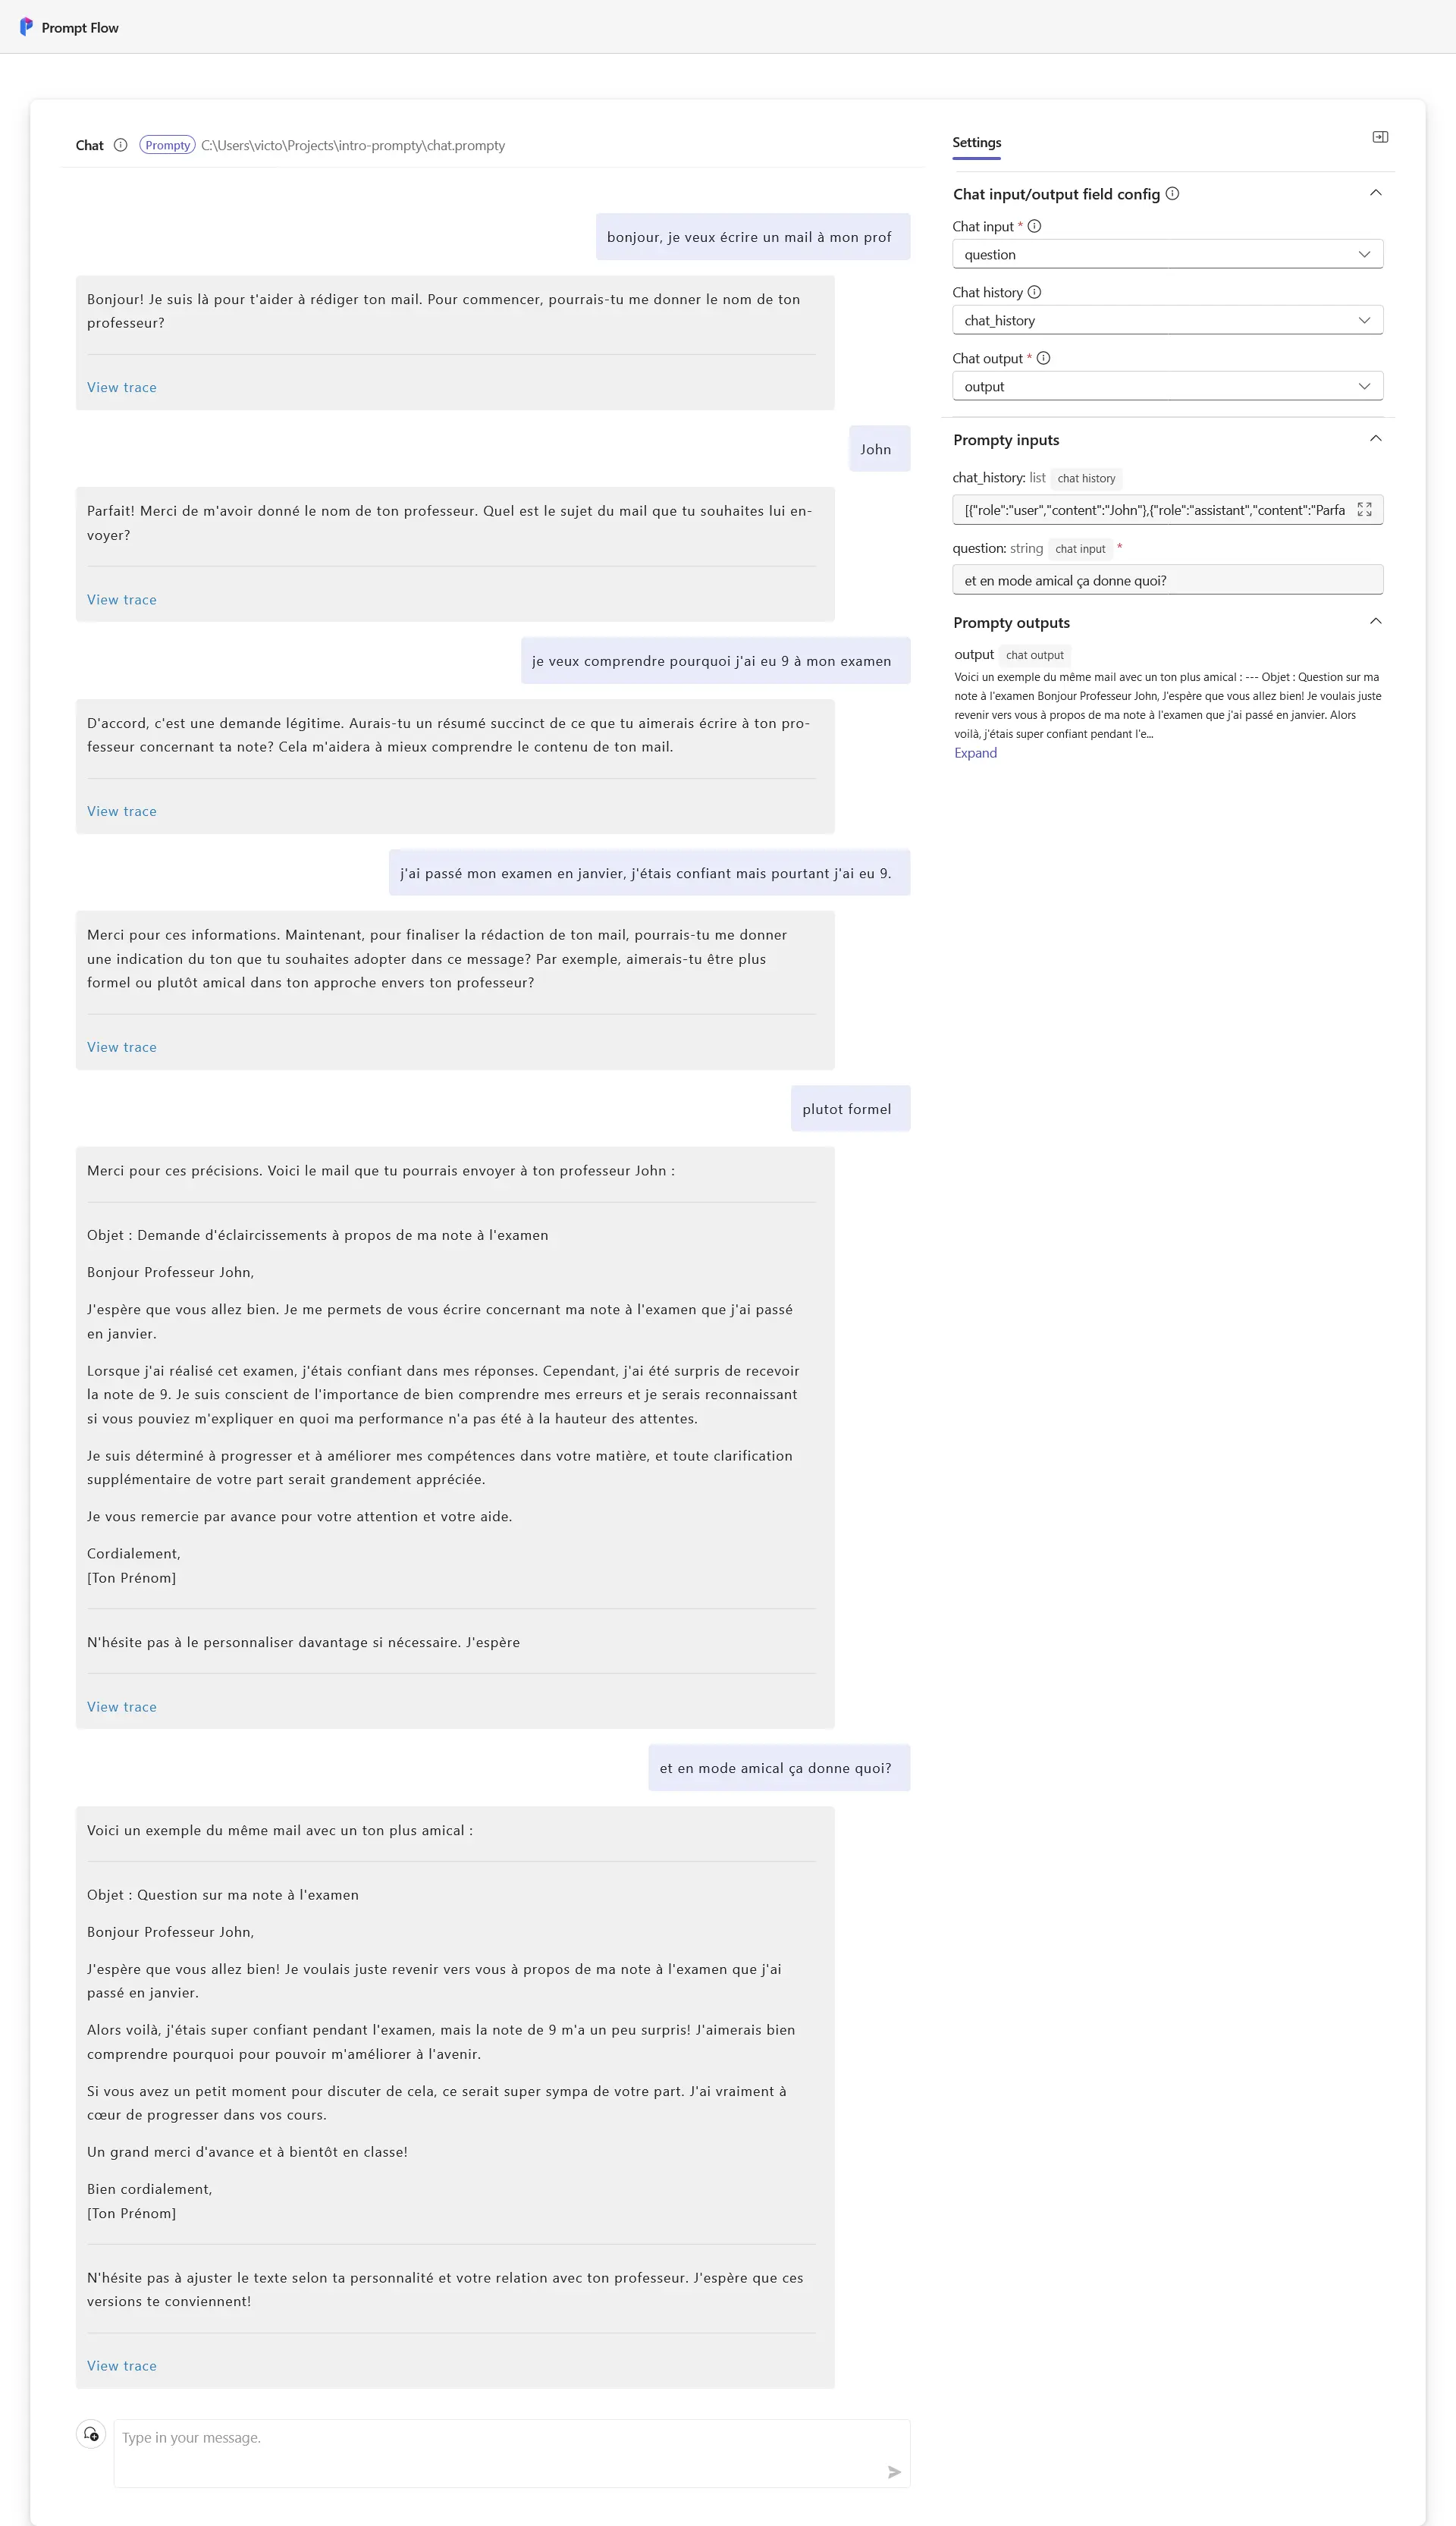
Example of a conversation to write an email..
If you’re used to Azure Ai, you won’t be lost in the interface. As you can see in the screenshot, he kept asking me questions to get the necessary information to help me write my email. Thanks to the history, he was able to keep the information I gave him in context.
Integration into a Python script Link to heading
Now that you have the basics to create a Prompty, you can integrate it into any Python script.
To do this, you need to load the .prompty file from the Prompty class in promptflow.core and use it with the right inputs.
Start by creating a Python file called run.py:
from promptflow.core import Prompty

prompty = Prompty("hello-world.prompty")
response = prompty(first_name="John", last_name="Doe", tone="drôle")

Result of the call from Python
Now you have the basics to make the Prompty you want!
Conclusion Link to heading
We were able to discover quite a few features of Prompty and Promptflow. I tried to keep it simple without forgetting any details so that it can be accessible to as many people as possible.
I hope I’ve given you the desire to try Prompty and discover the rest of Promptflow’s features. I will publish another article soon to present some more advanced features, and we will end up mastering all the possibilities of Promptflow together!
See you soon! 😎